Belgian Cobblestone Mold
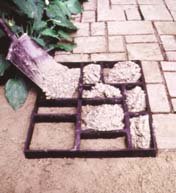
I'm a 33 year old petite woman (5 feet tall, 125 lbs). I saw this on HSN and decided to buy it since I love doing things myself especially if it will save me a buck. This turned out to be easy but only after some trial and error (my first few look like crap). First and foremost, the hardest thing about using these molds is dealing with the concrete. I used 1 -60lb bag of QUICKRETE per mold. Initially I was mixing by hand which was extremely exhausting. My neighbor let me borrow his drill and concrete mixer extension (drill $40 and extension $15) which made the job go a whole lot easier and faster. Definitely worthy of the $55 investment if you don't have one already or one you can borrow. It was taking me 35-45 minutes per mold before using the drill. Another thing, the Quickrete bag says to use half a gallon of water. I found that this was not enough. It should look like thick oatmeal when you are done mixing. This equated to 12 cups of water for me. Another important step which made it very difficult for me to remove the mold at first: MAKE SURE THE MOLD IS RIGHT SIDE UP. I know this may sound stupid and believe me I felt stupid after I realized my mistake but I was so excited to start I just dropped the thing and started filling it with concrete not realizing that it would make a difference. If the mold is not the correct way up it will be very difficult to remove the mold and your bricks will get stuck and crumble as you try to force the thing out. It takes about 4-5 minutes to mix the quickrete when using a drill and about 2-3 minutes to fill the mold and smooth out the top using a trowel (get one that is wide and smooth on all sides). Let it set in the mold for about 1-2 minutes and use the tabs on each side of the mold to lift it up. So a total of about 10 minutes (tops) per mold. Another tip I learned is to tap the sides of the mold to release the bubbles in the concrete and smooth again. Also, if you don't have a wheel barrel, use one of those big totes they sell at Walmart or something rectangular in shape. It's hard to maneuver the concrete in those 5 gallon buckets as I also learned the hard way. Lastly remember to cure the concrete by wetting it for a few days after its done. Its important to mention also that the bricks are removable and can be placed however you want. You need to use sand to fill in the gaps and make them more compact. I stretched my job out over a couple of days but thats because I started about 5-6 the hard way and it was taking me too long to finish each one. The whole project (25 molds) should have only taken me about 4 hrs start to finish. The finished project is beautiful and looks professionally done.
Get your Belgian Cobblestone Mold Now!
When I saw this I wanted to use it, but was afraid that it wouldn't turn out that well. I went ahead and bought it anyways and I am sure glad I did. The hardest part about this project is leveling the base. After that it is just place, pour and wait. I have gotten so many compliments on the sidewalk that I wish I would have done it sooner! It takes just less than an 80 lbs. bag of concrete, so the work definitely isn't light. And speaking of the concrete, DO NOT WASTE YOUR TIME WITH THE ODJOB MIXER! I used it to mix my first batch and that was all I needed to see. The concept is good, but the reality is that its a pain in the back. Use the $29 you would spend on it and buy yourself a wheelbarrow or rent a mixer for a day. Other than that, this really is an easy project tackle. If you have a large area to cover (mine was 120 sqft.) I recommend getting 2 molds. You can find them elsewhere being sold in sets of 2 for just a little more than the cost of one.
BalasHapusI'm a 33 year old petite woman (5 feet tall, 125 lbs). I saw this on HSN and decided to buy it since I love doing things myself especially if it will save me a buck. This turned out to be easy but only after some trial and error (my first few look like crap). First and foremost, the hardest thing about using these molds is dealing with the concrete. I used 1 -60lb bag of QUICKRETE per mold. Initially I was mixing by hand which was extremely exhausting. My neighbor let me borrow his drill and concrete mixer extension (drill $40 and extension $15) which made the job go a whole lot easier and faster. Definitely worthy of the $55 investment if you don't have one already or one you can borrow. It was taking me 35-45 minutes per mold before using the drill. Another thing, the Quickrete bag says to use half a gallon of water. I found that this was not enough. It should look like thick oatmeal when you are done mixing. This equated to 12 cups of water for me. Another important step which made it very difficult for me to remove the mold at first: MAKE SURE THE MOLD IS RIGHT SIDE UP. I know this may sound stupid and believe me I felt stupid after I realized my mistake but I was so excited to start I just dropped the thing and started filling it with concrete not realizing that it would make a difference. If the mold is not the correct way up it will be very difficult to remove the mold and your bricks will get stuck and crumble as you try to force the thing out. It takes about 4-5 minutes to mix the quickrete when using a drill and about 2-3 minutes to fill the mold and smooth out the top using a trowel (get one that is wide and smooth on all sides). Let it set in the mold for about 1-2 minutes and use the tabs on each side of the mold to lift it up. So a total of about 10 minutes (tops) per mold. Another tip I learned is to tap the sides of the mold to release the bubbles in the concrete and smooth again. Also, if you don't have a wheel barrel, use one of those big totes they sell at Walmart or something rectangular in shape. It's hard to maneuver the concrete in those 5 gallon buckets as I also learned the hard way. Lastly remember to cure the concrete by wetting it for a few days after its done. Its important to mention also that the bricks are removable and can be placed however you want. You need to use sand to fill in the gaps and make them more compact. I stretched my job out over a couple of days but thats because I started about 5-6 the hard way and it was taking me too long to finish each one. The whole project (25 molds) should have only taken me about 4 hrs start to finish. The finished project is beautiful and looks professionally done.
BalasHapusWorks exactly as described. Consider buying a second one though so you can use while the first is setting up.
BalasHapus